There are three different systems that I have used:
- ESP32-CAM
- ESP32-S3-CAM
- Raspberry Pi Zero 2 W
This page explains these systems and discusses the capabilities, use cases, and cost of each system. It also gives examples of videos I have created with these systems.
A major caveat: these systems all need to be programmed. This is not simple for someone who has no experience with this. I have been working with these systems for over a year and a big part of the motivation has been to develop my skills. For these systems, I have:
- programmed in C++ and Python
- created HTML and JavaScript code
- designed a circuit board (for the ESP32-S3-CAM) and had it produced in China
- soldered circuits
- designed and 3D printed parts
- constructed wooden housing
If you are not interested in developing these skills, it may be best to purchase a ready-made system, such as a bird camera, a trail cam, or a GoPro. With the systems below, you gain cost-savings and flexibility at the expense of convenience and reliability.
All of that being said, this is a great way to be able to dedicate a low-cost camera to a specific project for months at a time. There is enough memory on an 8GB SD card to record images with the ESP32-CAM or ESP32-S3-CAM every minute for over 100 days if you avoid taking images at night.
Another caveat: The links I have provided are informational only. I cannot recommend these specific suppliers. There are some ESP32 variants that I have not been able to get to work.
ESP32-CAM
The ESP32-CAM is a microcontroller that can be programmed with the Arduino IDE. As you can see in the picture below, each module is actually two separate pieces. The lower part is used to provide power and to program the upper part. Technically, the ESP32-CAM is just the upper part. But without the lower part, you would need external circuitry to power the device. The camera is 2 megapixels, which is adequate for monitoring a system, but the images do not compare to the quality available with the Raspberry Pi.
Images are written to the SD card which can then be read on a laptop computer. The system is programmed by connecting the device to a computer using a USB cable. The program is stored on the device independent of the SD card.
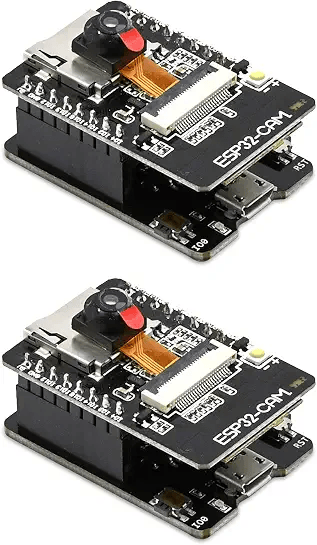
https://www.amazon.com/ESP32-CAM-MB-Aideepen-ESP32-CAM-Bluetooth-Arduino/dp/B0948ZFTQZ
As of June, 2026, it costs about $25 for 2.
You will also need a 5V charger, USB cable, and an SD card.
| ESP32-CAM | $13 |
| USB cable | $5 |
| 5V charger | $5 |
| SD card | $8 |
| Total | $31 |
ESP32-S3-CAM
Although this may seem like it would be very similar to the ESP32-CAM, it is a major step up. It also is programmed with the Arduino IDE. In fact, with minimal tweeks, the same program can run on either system. However, the ESP32-S3-CAM exposes many of its pins, allowing for easier connection to external circuits. For me, this was critical for adding a real-time clock, which, in addition to providing accurate time stamps for your images, also provides a way to reset the system if it hangs, which all of these devices will occasionally do.
The processor is faster, so images can be saved more quickly but this still tends to be limited by the time it takes to write to the SD card. The system I use has a 2 MP camera, though the one pictured below uses a 3 MP camera.
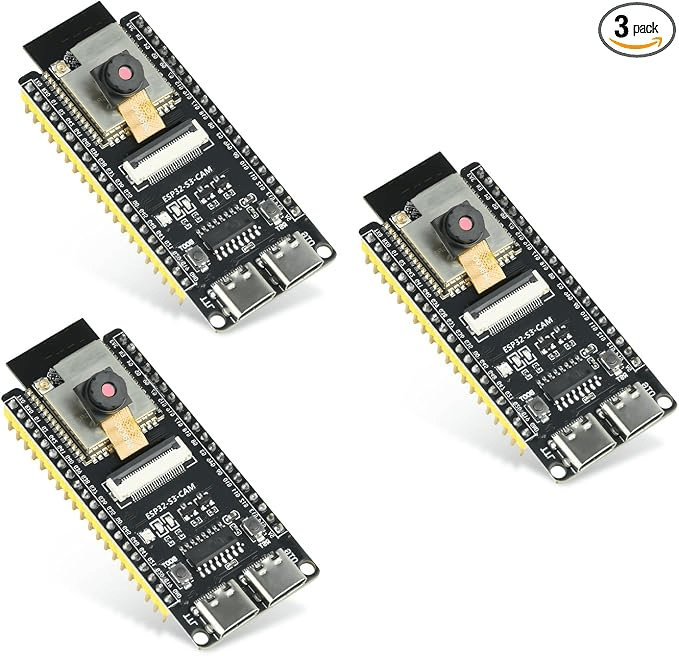
As of June, 2026, it costs $35 for 3
You will need a 5V charger, USB cable, and an SD card. To take advantage of the real-time clock, you will need a circuit board, real-time clock, and battery.
| ESP32-S3-CAM | $12 |
| SD card | $8 |
| USB cable | $5 |
| 5V charger | $5 |
| real time clock | $3 |
| 2032 lithium battery | $1 |
| circuit board | $1 |
| Total | $35 |
Raspberry Pi Zero 2 W
The Raspberry Pi Zero 2 W is a full computer and can do things like motion detection and facial recognition. The camera is significantly better, but also adds significantly to the cost. It is significantly faster than the other systems which allows it to do high-quality video. Unlike the other systems, it does not have an analog-to-digital converter, so it can’t, for example, record temperature reading without additional hardware. Its clock is set via the internet and will continue to maintain the correct time after it has lost a WiFi connection for as long as it continues to have power.
The operating system and all data is stored on the SD card. This requires a lot of writing to an SD card which can wear it out quickly. It is important to invest in a high quality SD card, such as a SanDisk Max Endurance card, which adds to the cost of the system.
The SD card is formatted for the Linux operating system and therefore is not directly readable by a Windows operating system. Fortunately, data transfer to a Windows computer can be done easily over WiFi without removing the SD card from the Raspberry Pi.
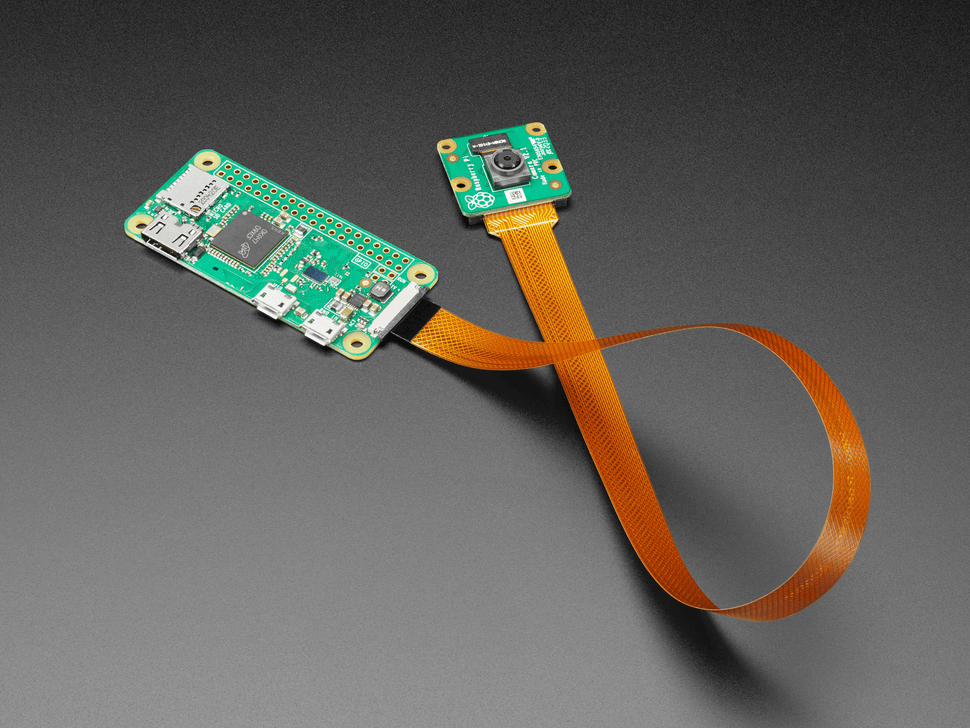
I usually buy the components I need for this system from Adafruit.
| Raspberry Pi Zero 2 W | $20 |
| Raspberry Pi Camera | $30 |
| Camera cable | $4 |
| USB cable | $5 |
| SD card | $30 |
| 5V charger | $5 |
| Total | $94 |
Comparison
| ESP32-CAM | ESP32-S3-CAM | Raspberry Pi Zero 2 W | |
| Cost | $31* | $35* | $94 |
| Camera | 2 MP | 2 MP | 12 MP |
| Video | No | No | Yes |
| Delay between images | 20 sec | 8 sec | 1 sec |
| WiFi | Yes | Yes | Yes |
| Operating System | Arduino-compatible | Arduino-compatible | Linux |
| Programming Language | C++ variant or Python | C++ variant or Python | Python, others |
| Maximum reliable SD card size | 8 GB | 8 GB | 32 GB |
| Program Changeable Over WiFi | No | No | Yes |
| Data Transfer | Reading SD card | Reading SD card | Over WiFi |
| Image Timestamped | No | With addition of real-time clock | If connected to Internet |
| Maintains time without WiFi even after temporary power loss | No | Yes with real-time clock | No |
| Requires external circuit | No | Yes for real-time clock | No |
| Infrared images | No | No | Possible with NoIR camera |
*cost is higher if you don’t buy in bulk
Use Cases
| ESP32-CAM | ESP32-S3-CAM | Raspberry Pi Zero 2 W | |
| Real-time monitoring over WiFi | Yes | Yes | Yes |
| Time lapse videos | Without time stamp | With time stamp | With timestamp |
| Long-term monitoring | Yes | Yes | Yes |
| Video | No | No | Yes |
| Intensive calculations (facial recognition, motion detection, etc) | No | No | Yes |
| Controlling external circuits | Difficult | Easy | Digital circuits only |
| Recording data from external circuits | Difficult | Easy | No built-in analog-digital converter |
Workflow
The workflow for the ESP32-CAM and the ESP32-S3-CAM is the same.
- Write a program on a computer.
- Connect the device to the computer through a USB cable.
- Download the program to the device.
- Set the device up where it is to record and plug it in.
- Monitor the images in real time by accessing a webpage the device is transmitting.
- When the project is complete, remove the SD card and retrieve the images through an SD card reader on your computer.
The workflow for the Raspberry Pi Zero 2 W is different because the program writing is done on the Raspberry Pi and can be changed during the project.
- Install the Raspberry Pi operating system on the SD card using your computer.
- Insert the SD card into the Raspberry Pi. The Raspberry Pi will connect to your home WiFi.
- Connect to the Raspberry Pi over WiFi using your computer using ssh.
- Write a program to run on the Raspberry Pi.
- Create a service to run the program every time is reboots.
- Set the Raspberry Pi camera up where it is to record and plug it in.
- Monitor the images in real time by accessing a webpage the device is transmitting.
- Download images and videos while the project is running.
- Improve the program by making changes to it over WiFi without physically accessing it.
Holders
I typically 3D print a part to hold the camera securely. For indoor or short-term projects, I often use a 3D print that adapts to a tripod. For long-term outdoor projects, I have built wooden boxes with windows and 3D print holders that attach to the inside of the box.
Power supplies
By far the easiest and most reliable power supply for these systems is through a USB cable connected to household current through a standard 5V converter. I have also powered projects by connecting to a USB port in a vehicle. When far from an outlet, rechargeable batteries and solar panels are an option although you have to be careful with power management to avoid the system crashing and rebooting when it tries to draw too much current.


Leave a comment