This is part of a series of posts on getting started with Arduino. Others in the series include:
- Arduino: Getting Started
- Arduino: Basic Troubleshooting
- Arduino: Understanding the Structure of C
- Arduino: Understanding Blink
- Arduino: Modifying Blink
This post continues to focus on learning to program the Arduino by modifying “Blink”, greatly expanding its capabilities by adding variables and functions. This is a continuation of the previous post (Arduino: Modifying Blink) and you should read that one first.
We will be converting the Blink program into one that can blink the entire Morse code.
The Blink Program
void setup() {
  pinMode(LED_BUILTIN, OUTPUT);
}

void loop() {
  digitalWrite(LED_BUILTIN, HIGH);
  delay(1000);
  digitalWrite(LED_BUILTIN, LOW);
  delay(1000);
}
Morse Code
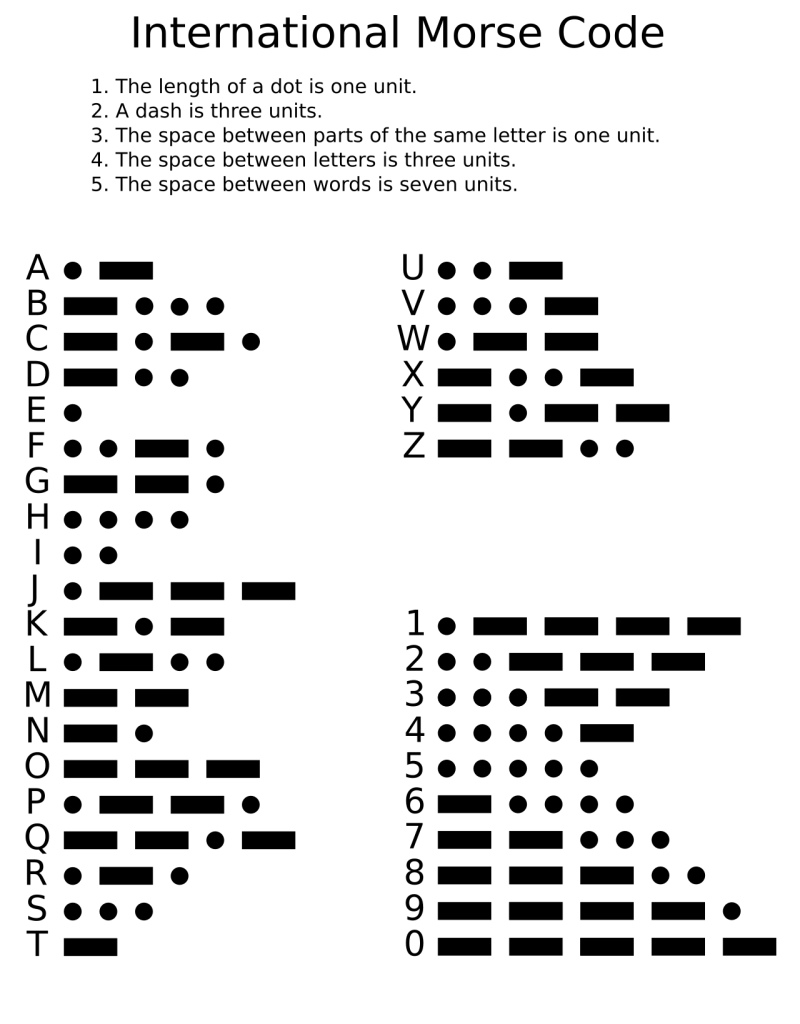
Although originally designed for the telegraph and rarely used today, Morse Code is still familiar to people as a code made up of a bunch of dots and dashes.
The Letter E
We can see that the Blink program as it is currently almost repeatedly sends out the letter E, a single dot, repeatedly. However, it could also be the letter S, 3 dots. The problem is that we need a space after the letter E to distinguish when the code for the letter ends. We see from the chart above that the space between letters should be 3 times as long as a dot. We can modify our code to reflect this.
void setup() {
  pinMode(LED_BUILTIN, OUTPUT);
}

void loop() {
  digitalWrite(LED_BUILTIN, HIGH);
  delay(1000);
  digitalWrite(LED_BUILTIN, LOW);
  delay(3000);
}
The Letter S
The letter S consists of 3 dots and then a space between letters. The pause after each dot is one time unit. We can modify our code without a lot of typing by copying and pasting the code within the loop.
void setup() {
  pinMode(LED_BUILTIN, OUTPUT);
}

void loop() {
//one dot
  digitalWrite(LED_BUILTIN, HIGH);
  delay(1000);
  digitalWrite(LED_BUILTIN, LOW);
  delay(1000);

//the second dot
  digitalWrite(LED_BUILTIN, HIGH);
  delay(1000);
  digitalWrite(LED_BUILTIN, LOW);
  delay(1000);

//the third dot
  digitalWrite(LED_BUILTIN, HIGH);
  delay(1000);
  digitalWrite(LED_BUILTIN, LOW);
  delay(3000);
}
Our program now blinks out an S.
There are a few problems which we need to address:
- The blinks are too slow.
- We lost the ability to blink an E.
- The code is going to get too long.
- The message we are sending will be hard to change.
We are going to modify our code to address each of these issues.
Adding the First New Function
A function is a block of code that can be used by another part of the code simply by referring to the name of the function. This is known as “calling” the function.
We are already using two functions, setup() and loop(). We can use those as examples of how to write a function.
void setup() {
  pinMode(LED_BUILTIN, OUTPUT);
}- “void” is the type of the function. This is often a source of confusion for beginning programmers. Some functions may return a value that is an integer or a String or some other variable type. Our function does not return a value and therefore it has no type, which is indicated by the word “void”.
- “setup” is the name of the function. You can name your function just about anything you want. The computer just sees the name as a label and will gladly use whatever name you give the function as a label, but it won’t try to find any meaning in the name.
- “()” are used to send information from the rest of the program to the function. We won’t be doing this for a while so there is nothing inside the parentheses.
- “{}” indicate the beginning and end of the function. We can put whatever code we want between the brackets.
The code within loop() already does something useful; it blinks out the letter S. However, we lost the code to blink out the letter E when we made it blink S. We can save our code into a function so that it can be used repeatedly.
void setup() {
  pinMode(LED_BUILTIN, OUTPUT);
}

void loop() {
   S();
}

void S() {
//one dot
  digitalWrite(LED_BUILTIN, HIGH);
  delay(1000);
  digitalWrite(LED_BUILTIN, LOW);
  delay(1000);

//the second dot
  digitalWrite(LED_BUILTIN, HIGH);
  delay(1000);
  digitalWrite(LED_BUILTIN, LOW);
  delay(1000);

//the third dot
  digitalWrite(LED_BUILTIN, HIGH);
  delay(1000);
  digitalWrite(LED_BUILTIN, LOW);
  delay(3000);
}
The hidden program inside the Arduino still only calls setup() once and then calls loop() repeatedly. It is not going to call our new function S() directly. However, when the hidden program calls loop(), it will find a single instruction, which is to call S(). So, the program now calls S().
From this we can easily see how we can add code for other letters. However, before we get carried away with doing that, there are a couple of other issues to address.
Adding More Functions
The code for blinking an S requires three blinks. But it takes four lines of code for each blink. We can use the idea of functions to shorten our code.
void setup() {
  pinMode(LED_BUILTIN, OUTPUT);
}

void loop() {
   S();
}

void dot() {
//one dot
  digitalWrite(LED_BUILTIN, HIGH);
  delay(1000);
  digitalWrite(LED_BUILTIN, LOW);
  delay(1000);
}

void S() {
   dot();
   dot();
   dot();
   delay(2000);
}
The code for the first dot was put in a new function, dot(), and this is called repeatedly to make an S. Because each dot is followed by a delay of 1000 milliseconds, we add an extra delay of 2000 milliseconds to indicate the end of a letter.
It is easy to see how we could also add a function called dash(). We can also add functions for the space between the letters and the space between words.
Changing the Speed of the Blink
Before adding all of these additional functions, we should address the issue of the speed of the blink. All of the different durations of dots and dashes and spaces are based on the duration of a single time unit, the length of a dot. Instead of having to change the numbers of all of the delays sprinkled throughout our program, it would be nice to just change it once. Variables allow us to do that.
A variable is a section of memory. A variable has three properties.
- a name, which is a label that the program uses to refer to a section of memory
- a type, which is the size of that section of memory
- a value, which is the data stored in that section of memory
We are going to create a single variable called “timeUnit” which will hold an integer value and then refer to this variable throughout the code wherever we are dealing with a time delay.
Similar to in algebra, variables can be used with addition, subtraction, multiplication, and division. In this case, we are multiplying. We use the asterisk, *, instead of an x to indicate multiplication.
int timeUnit = 1000;

void setup() {
  pinMode(LED_BUILTIN, OUTPUT);
}

void loop() {
   S();
}

void dot() {
//one dot
  digitalWrite(LED_BUILTIN, HIGH);
  delay(timeUnit);
  digitalWrite(LED_BUILTIN, LOW);
  delay(timeUnit);
}

void dash() {
//one dash
  digitalWrite(LED_BUILTIN, HIGH);
  delay(3*timeUnit);
  digitalWrite(LED_BUILTIN, LOW);
  delay(timeUnit);
}

void spaceBetweenLetters() {
   delay(2*timeUnit);
}

void spaceBetweenWords() {
   delay(4*timeUnit);
}

void S() {
   dot();
   dot();
   dot();
   spaceBetweenLetters();
}
If we run this code, we find that nothing has changed. The Arduino still blinks out an S and it still does so at the same rate. However, we can easily change that rate by simply changing the value of our variable timeUnit. For instance, the change below will cut the duration of our dots, dashes and spaces in half.
int timeUnit = 500;Side Note: the delay in spaceBetweenWords() is only 4 * timeUnit instead of 7 because there is already 1 timeUnit delay at the end of a dot and 2*timeUnit delay at the end of a letter, which totals to 7*timeUnit.
SOS
Here is the full code to repeatedly send out the message “SOS”.
int timeUnit = 500;

void setup() {
  pinMode(LED_BUILTIN, OUTPUT);
}

void loop() {
   S();
   O();
   S();
   spaceBetweenWords();
}

void dot() {
//one dot
  digitalWrite(LED_BUILTIN, HIGH);
  delay(timeUnit);
  digitalWrite(LED_BUILTIN, LOW);
  delay(timeUnit);
}

void dash() {
//one dash
  digitalWrite(LED_BUILTIN, HIGH);
  delay(3*timeUnit);
  digitalWrite(LED_BUILTIN, LOW);
  delay(timeUnit);
}

void spaceBetweenLetters() {
   delay(2*timeUnit);
}

void spaceBetweenWords() {
   delay(4*timeUnit);
}

void S() {
   dot();
   dot();
   dot();
   spaceBetweenLetters();
}

void O() {
   dash();
   dash();
   dash();
   spaceBetweenLetters();
}
This program can be easily extended with additional functions for the Morse code of all letters and numbers. Function names must begin with a letter; you could not have a function called 7(), for example. You could use a function name like seven() or n7(), though.
Learning More
There is a lot more to learn, but this is enough programming to get you started and to help you understand someone else’s code.
There are links to a lot of tutorials on the Arduino at my Arduino & ESP32 hub. These tutorials focus on building electronic circuits that can be used to extend the functionality of an Arduino beyond just blinking a light.
The next post in this series is Arduino: Strings & Serial.

Leave a comment