This is part of a series of posts on getting started with Arduino. Others in the series include:
- Arduino: Getting Started
- Arduino: Basic Troubleshooting
- Arduino: Understanding the Structure of C
- Arduino: Understanding Blink
- Arduino: Modifying Blink
- Arduino: Functions & Variables
While our goal remains to convert the Blink program into one that will take input from the computer and convert it into Morse code, we are going to simplify things for a minute by creating a new program focused only on communicating between the Arduino and the computer.
How Computers Store Letters
The memory of a computer can only store numbers. If we want the computer to store anything else in its memory, such as a letter, we have to code that letter as a number.
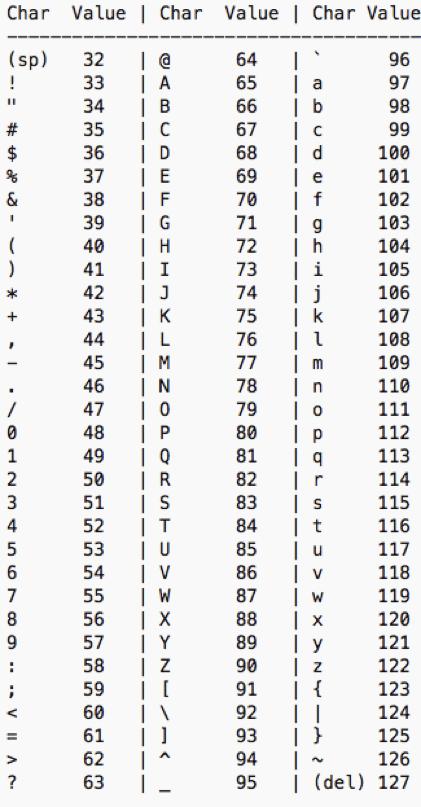
There is a standardized way to encode all printable characters (including letters, numbers, and punctuation) as numbers. This is called the ASCII code. This table shows the ASCII1 code for all of the printable characters.
Strings
In the last post, we discussed the variable type “int” which holds an integer. In order to tell the computer that the number in a memory space should be interpreted as a character instead of an integer, we use the variable type “char”, which holds only one character. If we want a variable to hold a string of characters, we use the variable type “String”2. For example, “WHAT HATH GOD WROUGHT”3 is a String. This string is 21 characters long.
The following code saves the string “SOS” to a variable named “message”. It is important to put the string inside quotation marks to let the computer know that SOS is a string and not a variable. (This is a common cause of errors for new programmers.)
String message = "SOS";The Serial Monitor
You can open up the serial monitor under the menu “Tools”. This will only open when the Arduino is connected to the computer.
The serial monitor will display information sent from the Arduino. There is also an entry box at the top of the serial monitor where you can type in information to send to the Arduino.
There is also a drop-down box in the lower right-hand corner where you can set the rate at which the Arduino and the computer will talk to each other. This number must be set the same on the Arduino and on the computer. For the Arduino Uno, this rate should be set to 9600 baud.
The Serial functions
Serial is a set of related functions that manage communication between the Arduino and the computer. We are going to use 4 functions.
| Function | What it does |
| Serial.begin() | Sets the rate that the Arduino will send a signal to the computer |
| Serial.available() | Determines how many characters are being sent from the computer |
| Serial.readString() | Gets the string of characters from the computer |
| Serial.println() | Sends information to the computer |
void setup() {
  Serial.begin(9600);
}

void loop() {
  if (Serial.available() > 0) {
    String message = Serial.readString();
    Serial.println(message);
  }  //end of if
}  //end of loop
When you type in text into the entry box on the serial monitor and press the enter key, the characters will be sent to the Arduino. When the Arduino detects that characters are available to be read, it will read the characters and store them in the variable “message”. It will then send the characters back to the computer and they will be printed on the serial monitor.
How Characters Are Numbered
Each character in a string is numbered, starting with zero.

We can access each individual memory location in a variable like this:
String message = "My information";
char c = message[0];
The variable c will contain the first letter of the text stored in message. In this case, c = ‘M’.
Printing Individual Characters
We can modify our code so that instead of printing back to the computer exactly what was typed, we can send back only the first character.
void setup() {
  Serial.begin(9600);
}

void loop() {
  if (Serial.available() > 0) {
    String message = Serial.readString();
    Serial.println(message[0]);
  }  //end of if
}  //end of loop
Printing the Last Character
It would be easy to modify the code to print the second or third letter of message. But what if we wanted to print the last letter of message? This is not as straightforward because there is no set length of message.
We can find the length of message using the function message.length().
It is important to remember that, because the characters are numbered from zero, the last character will be numbered one less than the length of the message.
For example, “My information” is 14 characters long, but the ‘n’ is numbered 13.
void setup() {
  Serial.begin(9600);
}

void loop() {
  if (Serial.available() > 0) {
    String message = Serial.readString();
    int i = message.length() - 1;
    Serial.println(message[i]);
  }  //end of if
}  //end of loop
Up Next…
The next post in this series is Arduino: If & For.

Leave a comment